Shopify Odoo Integration User Guide
Overview
Shopify is a complete e-commerce platform that lets you start, grow, and manage a business. By Connecting Shopify with Odoo Say no to spending lots of time by Automate almost all Oper sations like Import/Export Products and Collections, Import Customers, Import/Update Orders, Publish/Unpublish Products and Collections, etc. Analyze marketplaces with the help of Detailed Reports and Comparison to grow your business.
Key Features:
1. Real-time updates:
Real-time data synchronization between Shopify and Odoo automatically syncs products, orders, customers, and inventories.Real-time updates assure data uniformity on both platforms.
2. Centralized Inventory Management:
Control inventory levels across numerous sales channels using a single interface. Accurate inventory tracking can help prevent overselling and stock outs.
3. Order Management:
Easily import Shopify orders into Odoo for efficient processing.Keep clients informed by updating order statuses in real time.
4. Customer data management:
It involves synchronizing information to create a uniform database.Improve customer service by having access to the entire purchase history.
5. Product Information Management:
It involves synchronizing product details including descriptions, photos, and pricing.Manage product variations and collections effectively.
6. Accounting Integration:
It automates financial entries for sales, refunds, and expenses and alsoCreates financial reports and analyze business performance.
Benefits
Increased efficiency:
Automated synchronization reduces manual data entry and errors.
Better Decision Making:
Access to accurate and current data allows for more informed decision-making.
Improved Customer Experience:
Offer consistent and dependable service, including real-time updates and order tracking.
Scalability:
You can easily manage and scale your business operations as it grows.
Integration
Installation
- After downloading the Shopify Odoo Connector App from the Odoo store, place it in the Odoo Addons path or any desired location. Restart your Odoo instance and go to the Apps section in the dashboard. Click on "Update Apps List" from the menu. Once the list is updated successfully, the Shopify Odoo Connector will appear in the Apps section.
- Click the "Install" button, and you're all set! You can now use the Shopify Odoo Connector in your Odoo instance.
- Click "Update Apps List" from the menu. After the list updates, you'll see the Shopify Book Odoo Connector.
- Simply click "Install," and you're ready to use the connector in Odoo.
- Log in to apps.odoo.com (from the account you purchased the app)
- Download the latest version of your purchased app.
- Extract the zip and replace the folder with existing add-ons (Shopify Odoo Integration)
- 3.1 For Odoo.sh, Push the changes to the GitHub repository.
- Restart the Odoo service. (Only for Odoo On-Premise)
- Go to Apps ↣ Shopify Odoo Connector ↣ Upgrade
Set up the Shopify-Odoo Connector
Create an API Key and Secret Key
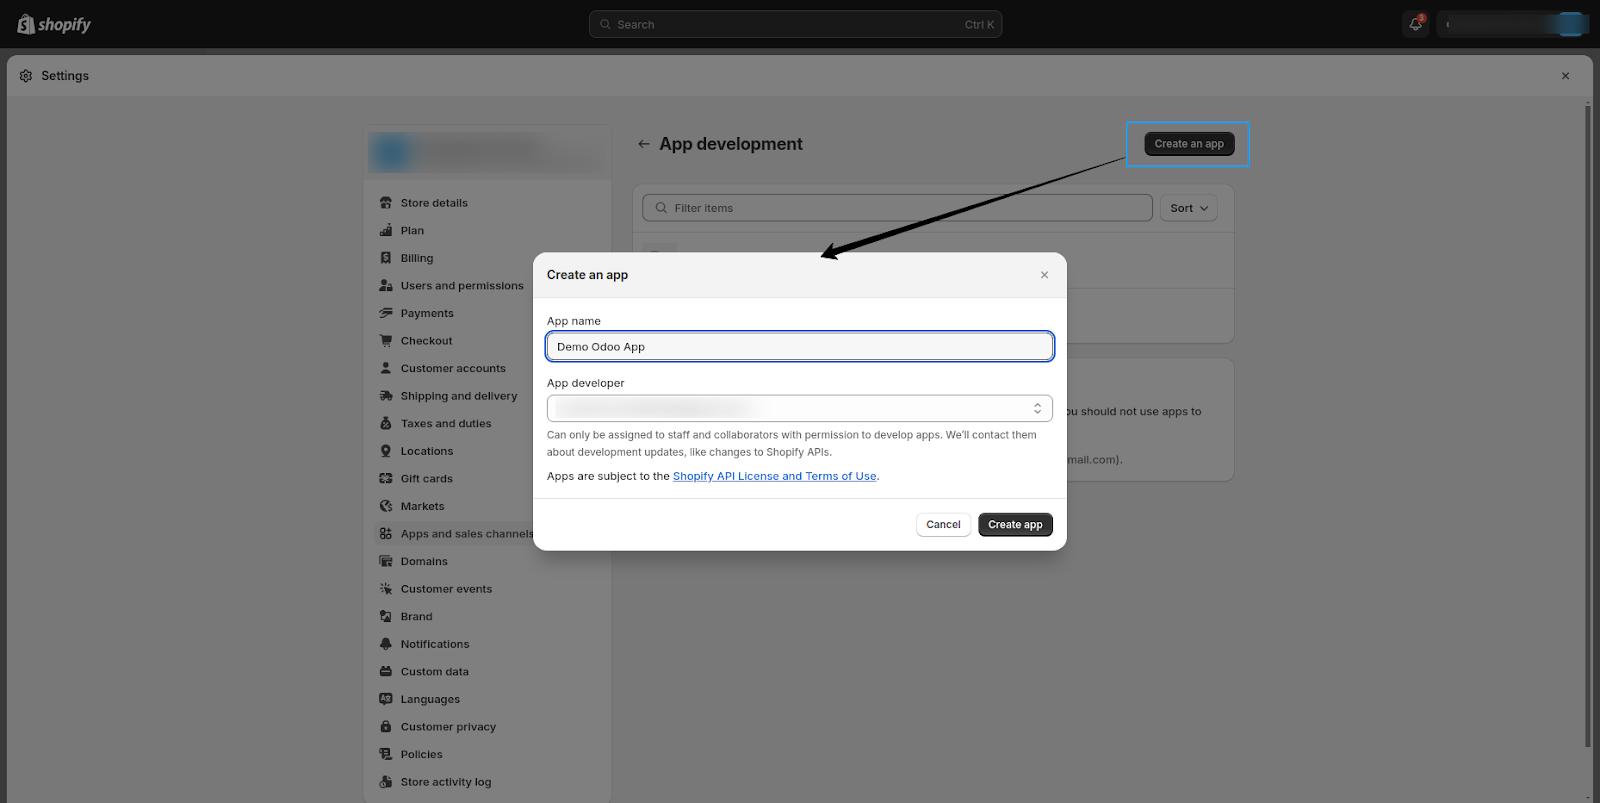
Access your Shopify account and locate the Apps option in the left-hand menu. Click on App and Sales channel settings option & at the above you'll find the option to Develop apps for your store. Click on it to view the list of configured development apps. In the top right corner, select Create an app and proceed to fill in all the necessary details.
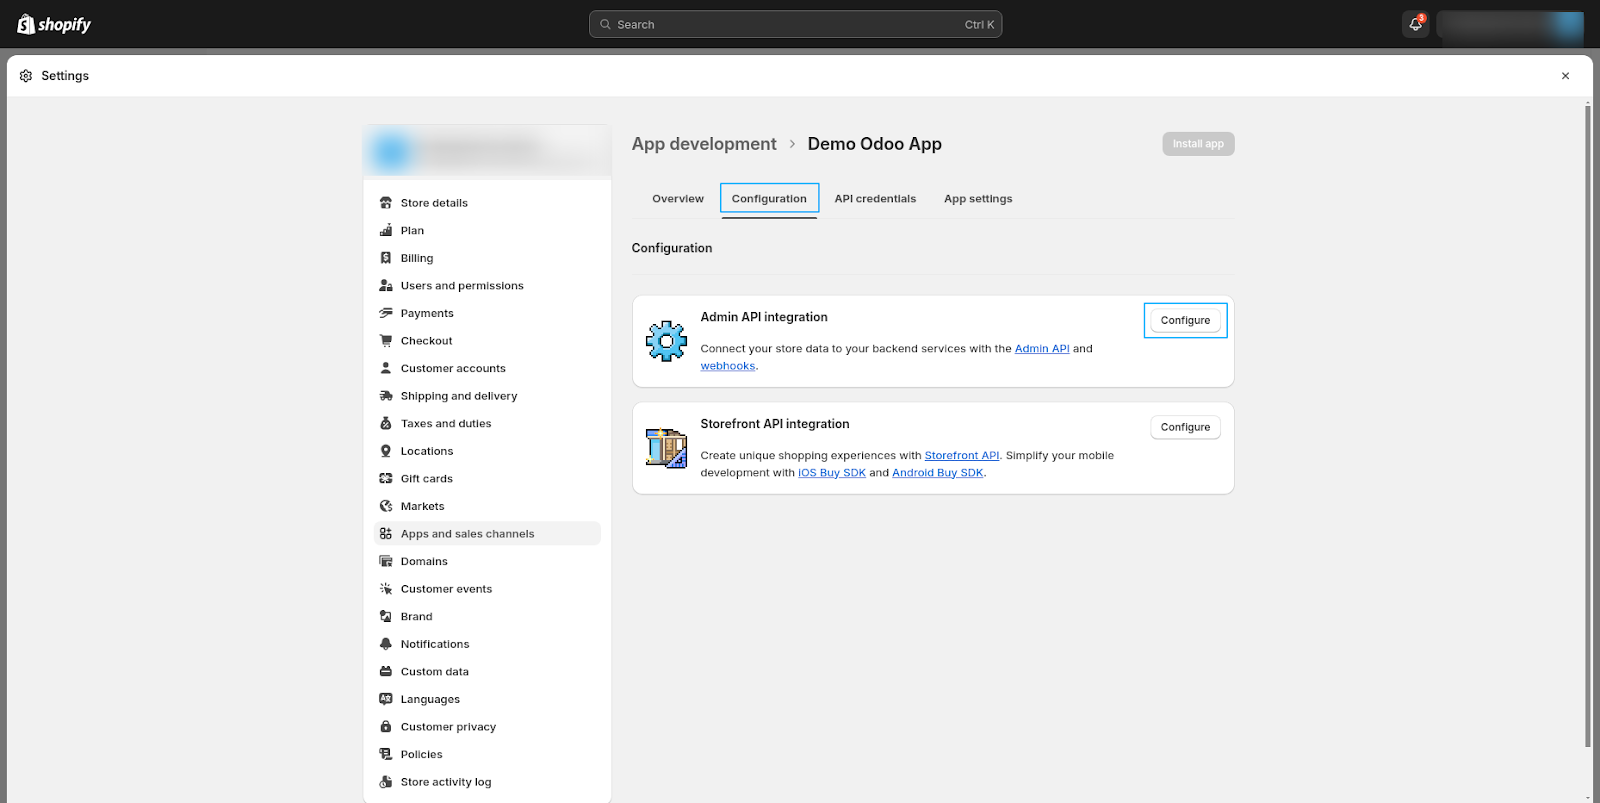
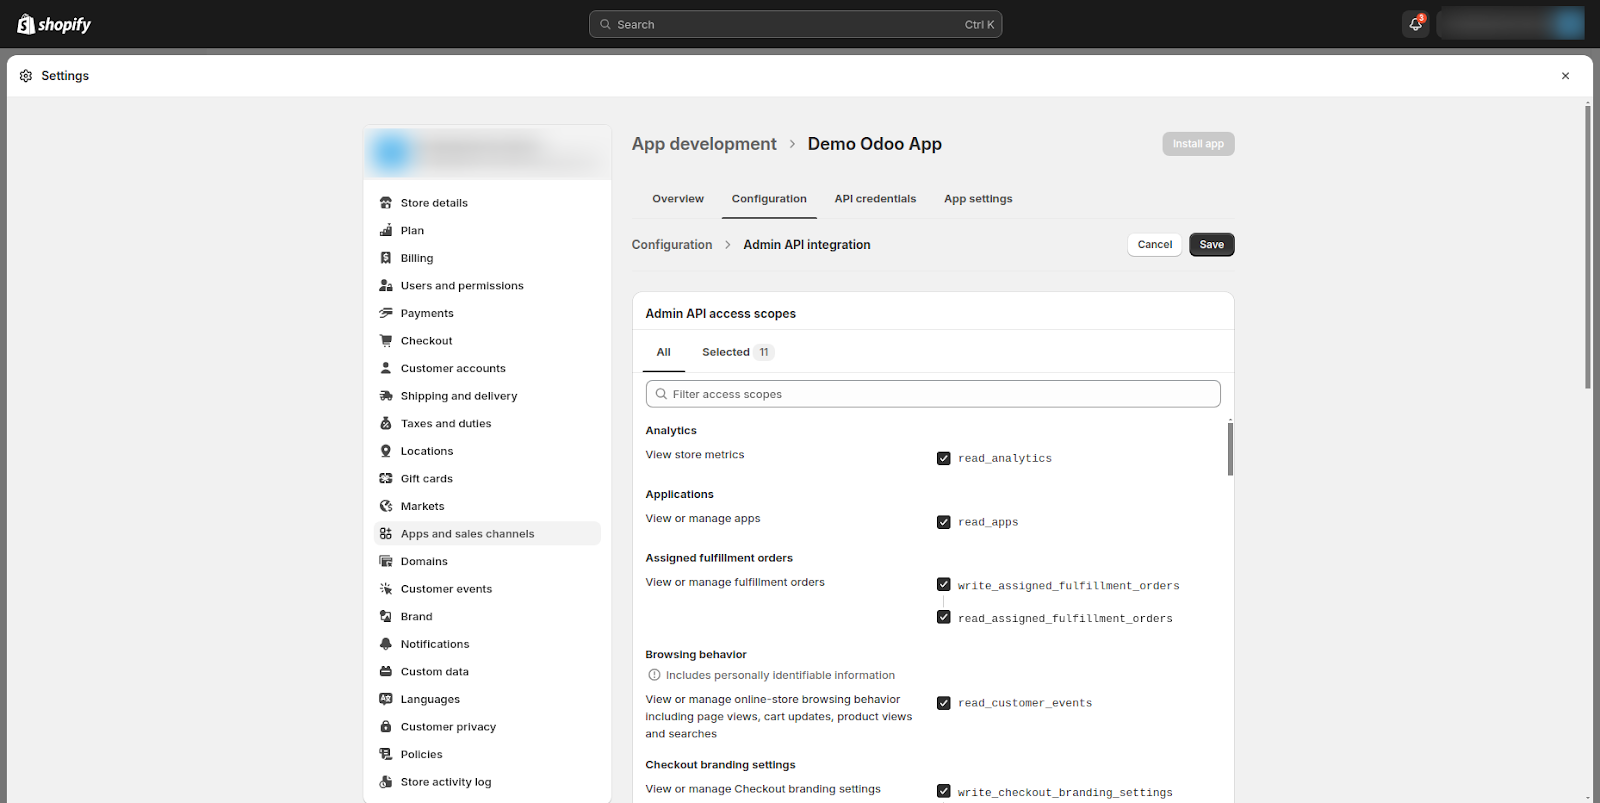
Proceeding to the Configuration > Admin API integration section, ensure that you meticulously adjust the permissions for each parameter to facilitate smooth synchronization between Shopify and Odoo. Parameters with solely Read Access will limit data access from Odoo, rendering them unmodifiable from the Shopify end. Hence, it is recommended to grant suitable permissions to specific parameters.
Below are screenshots listing parameters with the appropriate permissions for your reference. Once you have adjusted them accordingly, simply click on the Save button located in the top-right corner.
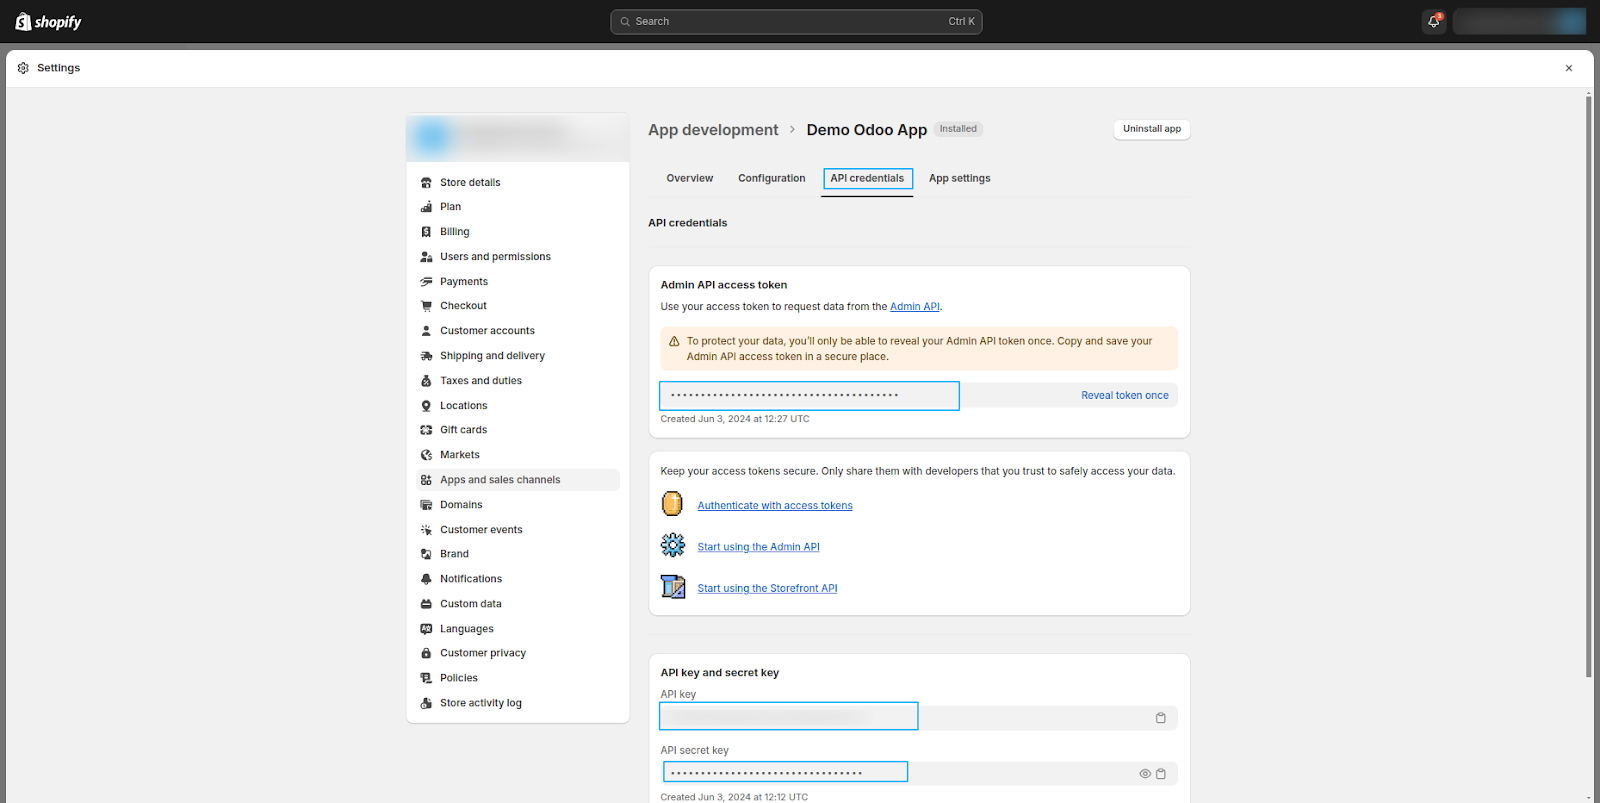
Now, proceed to the third page, API credentials. Here, you'll need to generate an Access Token. To do so, install the app by clicking on the "Install App" button.

Ensure that you copy the access token only once. If you forget to do so, you'll need to generate it again. Here, you can liken the access token to the password for accessing the Admin API.
Set up the Shopify Instance in Odoo
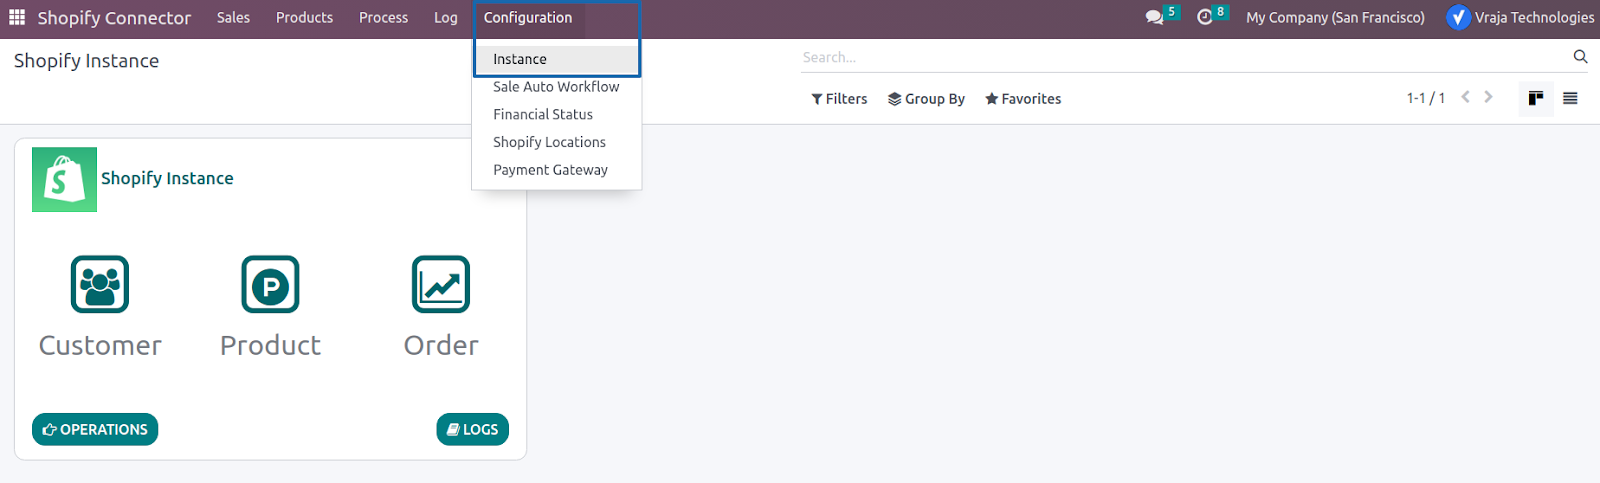
In Odoo, for each of your Shopify accounts, you'll need to establish an instance. This approach enables the management of multiple accounts through a single interface. Go to Shopify Connector > Configuration > Instance and click on the New button on the left top.

A new window will appear where you'll input essential details, such as the Credentials i.e. Host, Password, Secret Key, and API Key obtained from the Shopify backend.
After that set order configuration as per your need. Instructions given under each configuration, please select/enable option as per your need.

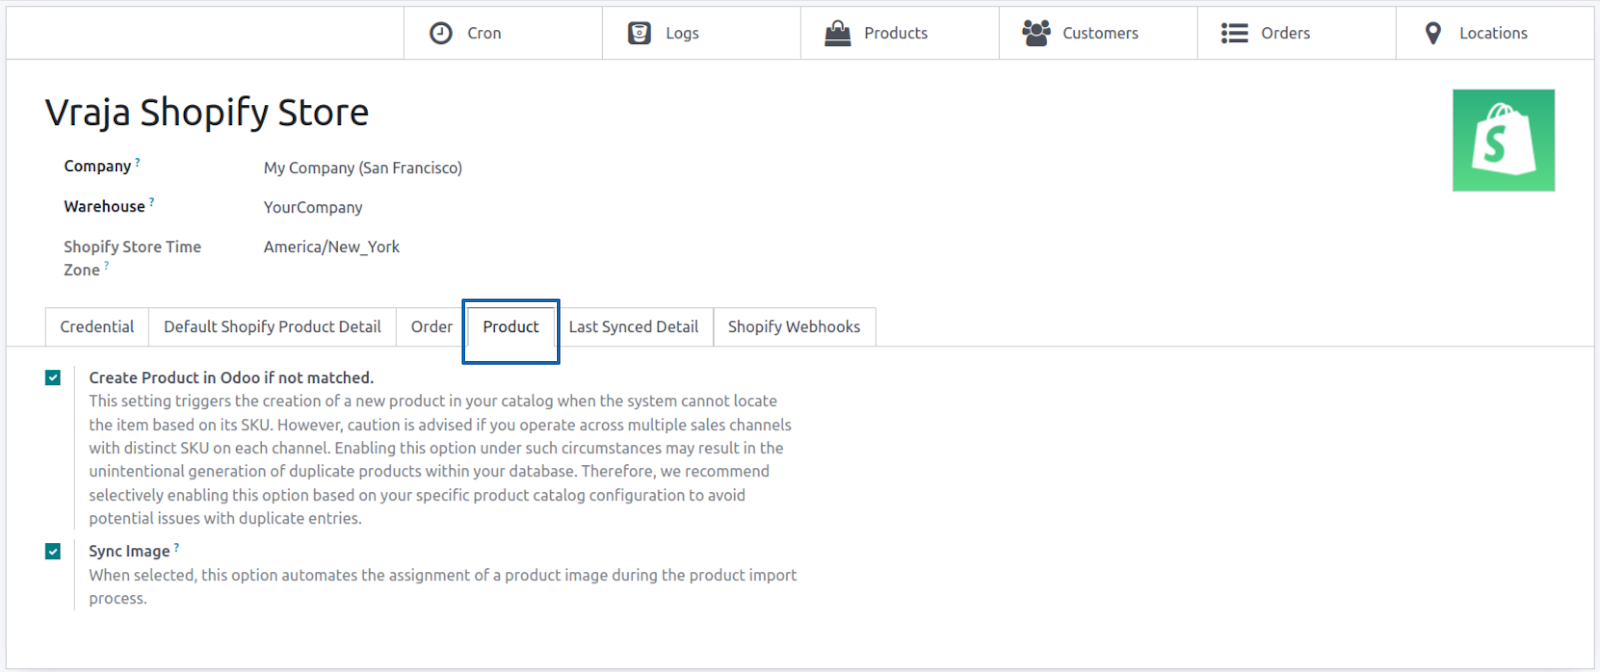
After that set product configuration as per your need. Instructions given under each configuration, please select/enable option as per your need.
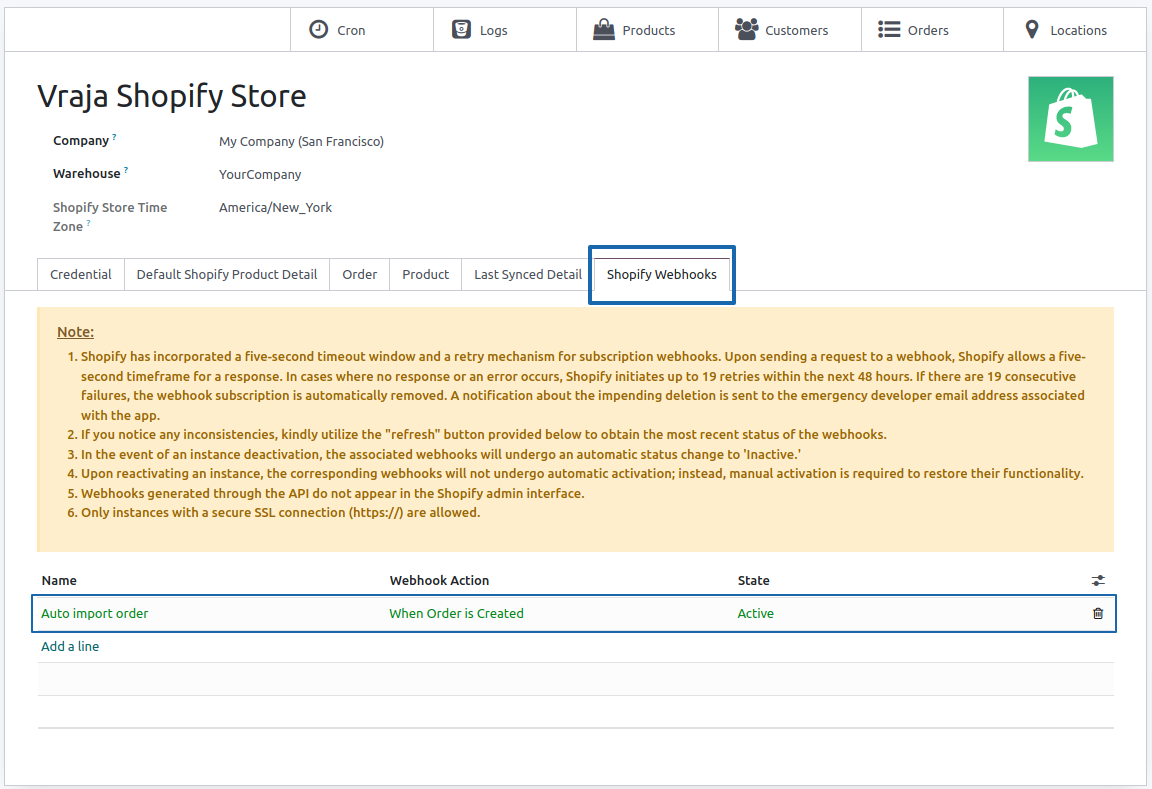
After that set webhook configuration as per your need.
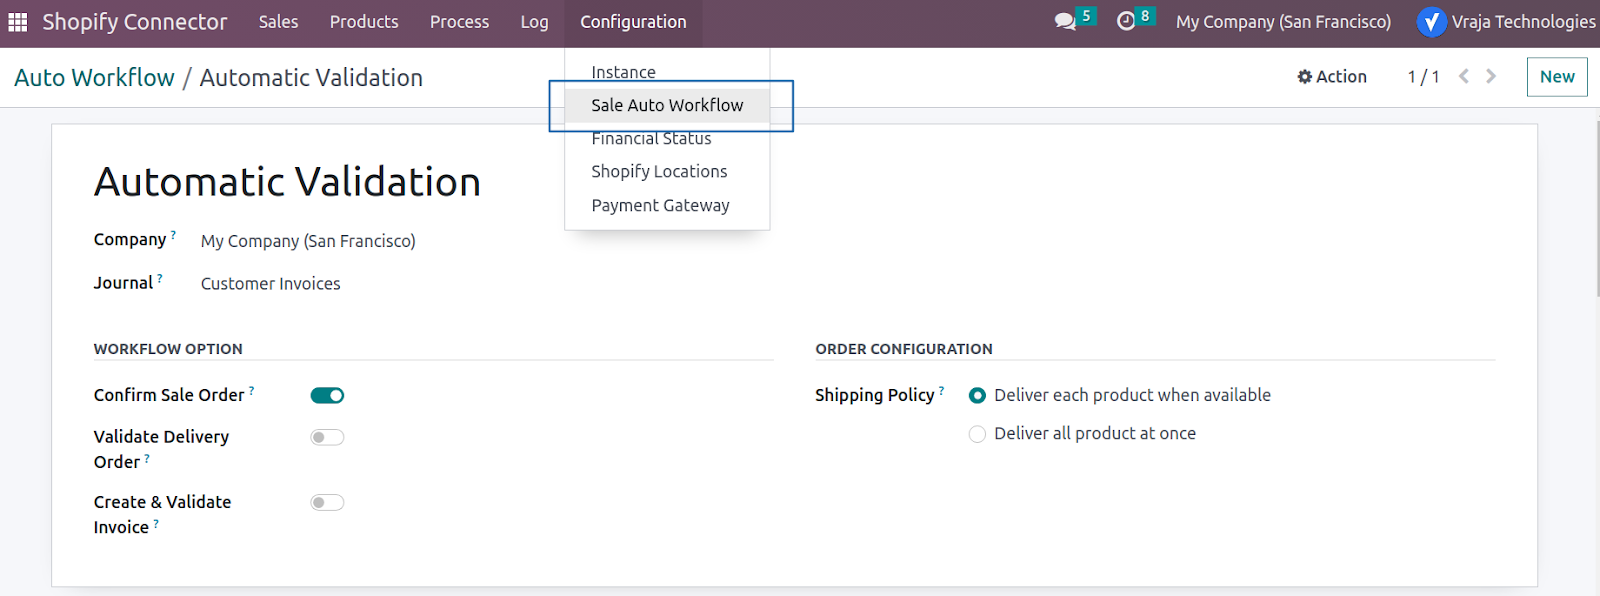
Sale Auto Workflow, Payment Gateway & Financial Status configurations. Location & logs
Sale Auto Workflow, To automate the process of importing orders from Shopify to Odoo, enable the necessary options in the Sale Auto Workflow according to your requirements.
1. Confirm Sale order : Auto Confirm Sales Order once it is imported from Shopify to odoo.
2. Validate Delivery Order : When sale order confirmed the Delivery order gets created & if you want to Validate Delivery Order then you need to enable this option.
3. Create & Validate Invoice : Automatically Create & Validate Invoice after the Delivery Order is processed.
Payment Gateway
Payment gateways are the types of payments you offer to your customers during checkout. Common payment gateways for eCommerce businesses include E-Wallets, Credit/Debit Cards, and Bank Wire transfers. Some of the payment gateways will import automatically when you create invoice & other than that you can create at your own.

Financial Status
After configuring the Workflow settings and adding a Payment Gateway, you can set up your financial status. This allows you to choose which orders to import based on their financial status, whether they are paid or unpaid.

Shopify Locations
1. When you create a new instance in Odoo, all the locations configured in your Shopify account will be automatically imported.
2. You have to set Export stock warehouses if you want to export stock from this location.
3. You have to set Import stock warehouse if you want to import stock from this location.

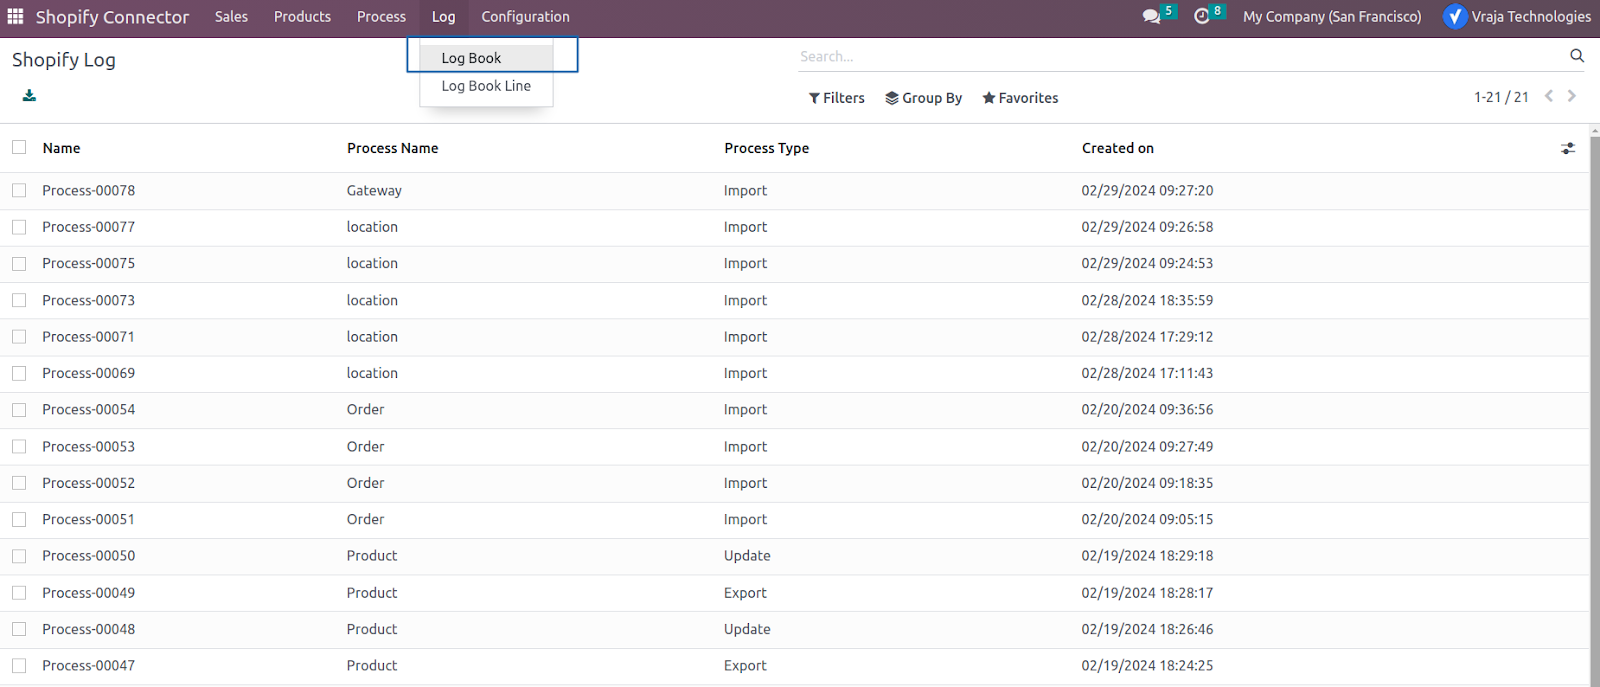
Log Book and Log Book Line
The Success process and Mismatch process we handled & create their logs based on different different process. Allowing you to identify the reasons for the failures. Below given some of the common examples:
1. During the order import from Shopify, the Sales Auto Workflow was not located.
2. During the order import from Shopify, the customer is not found in the order.
3. During the synchronization of products between Shopify and Odoo, the products (SKU) are not located in Odoo.
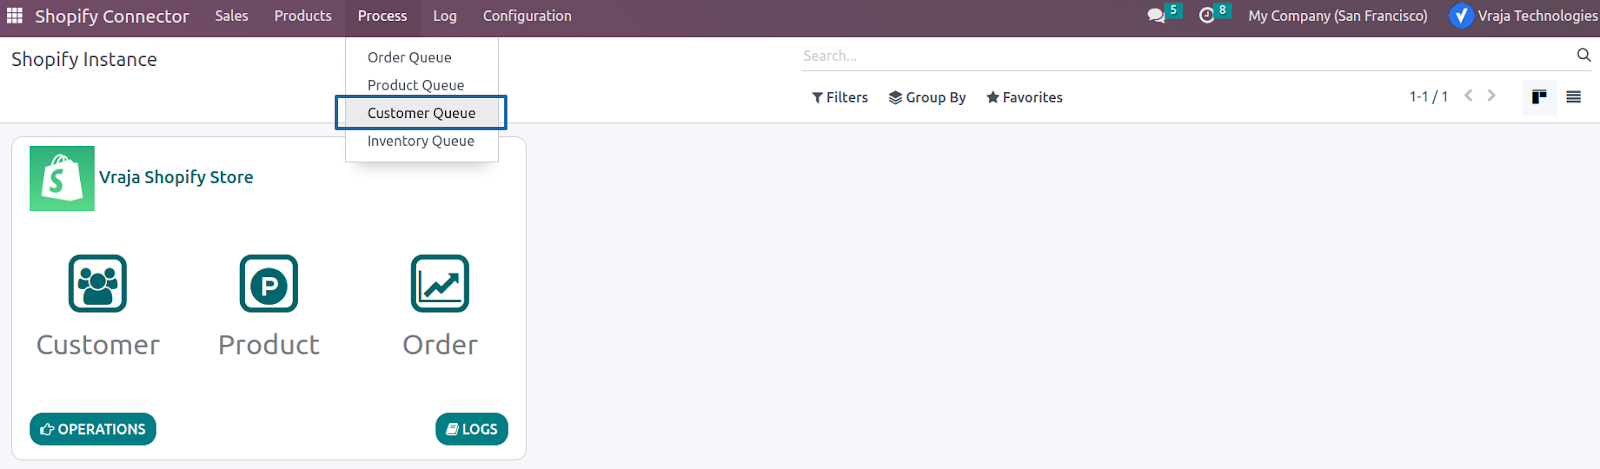
Import Customer Process
To manually Import Customers, from Operations button choose Import Customer option. This operation begins by retrieving customer data from Shopify stores to Odoo.
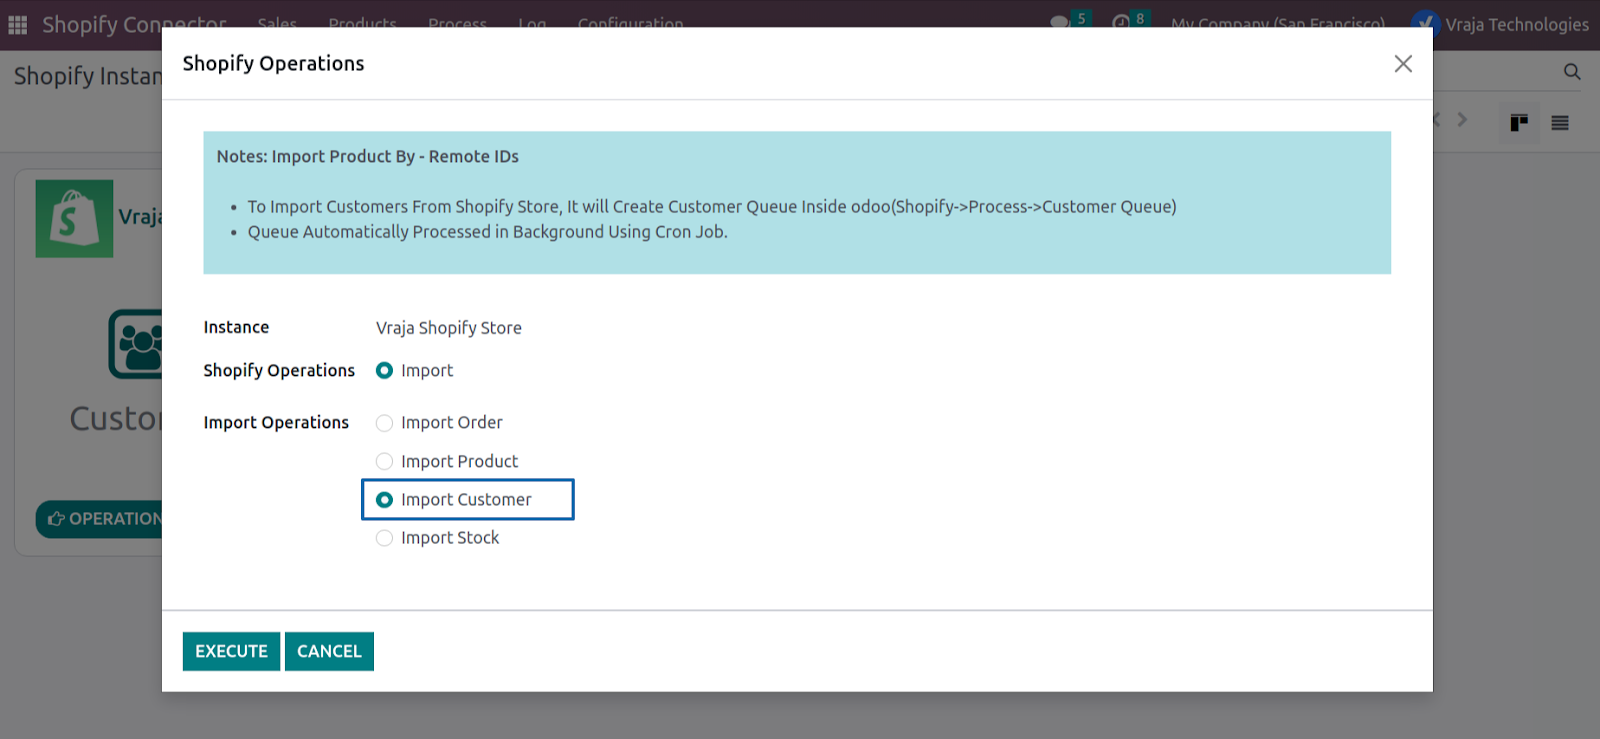
Adds it to the Customer Queue for processing. (Navigate to Shopify Connector > Process > Customer Queue). In that queue you need to click on “Process Queue Manually” button to execute process.
Product Process
Managing product data between Shopify and Odoo is essential for every seller. Numerous considerations must be addressed when importing and exporting this data.
1. Import Product
To manually Import products, from Operations button choose Import Product option.You can import products in two ways, i.e. Based on From and To Date & Specify Shopify Template IDs
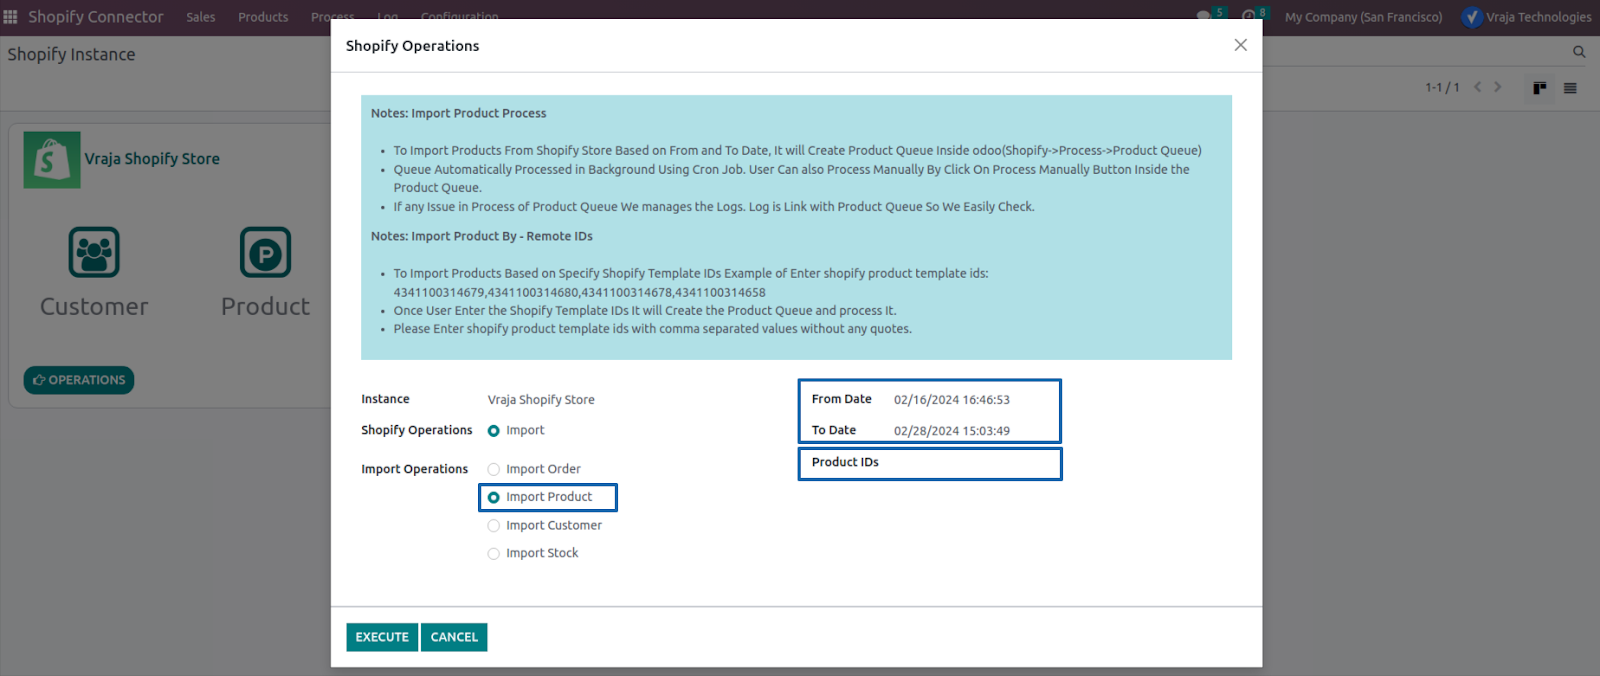
Adds it to the Product Queue for processing.(Navigate to Shopify Connector > Process > Product Queue).

If you want to process the queue instantly then click on the Process Queue Manually button.
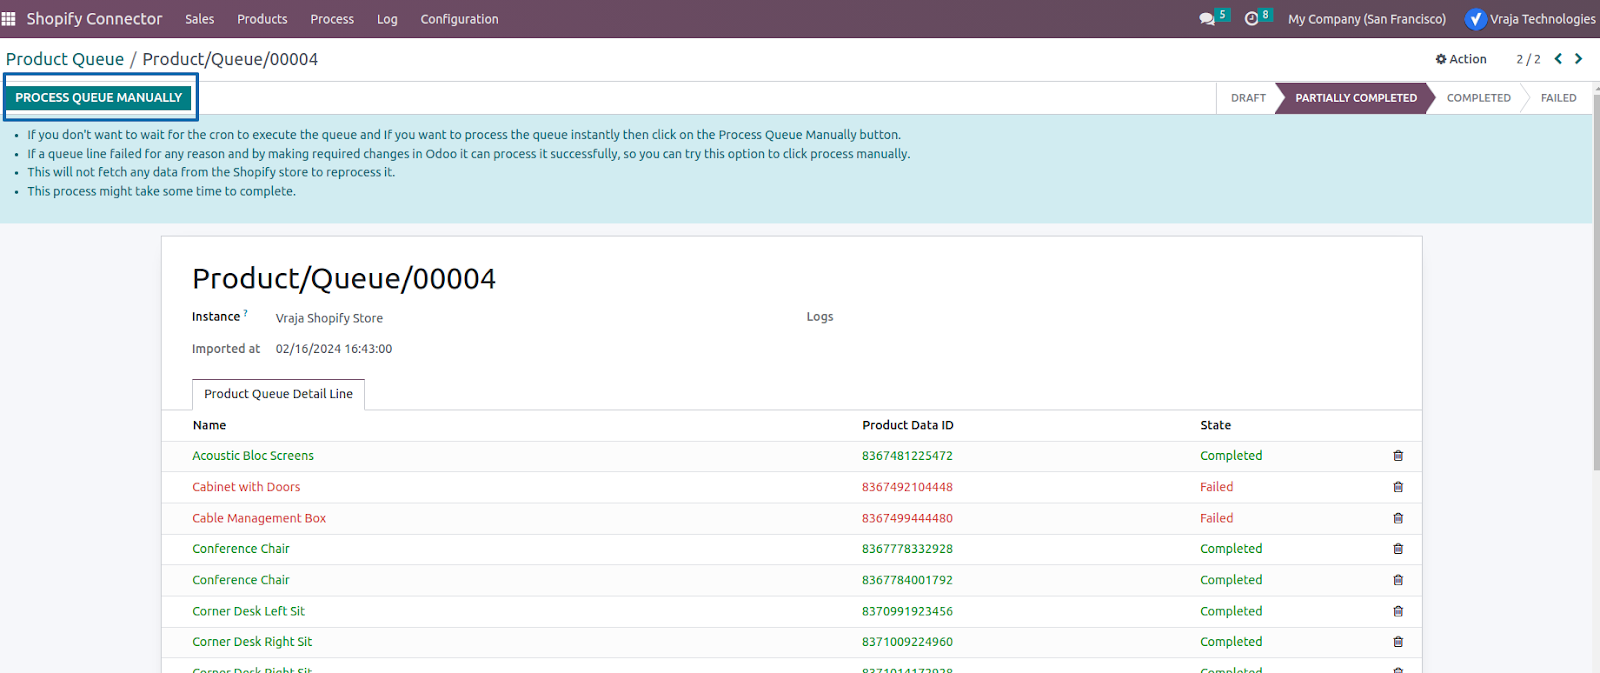
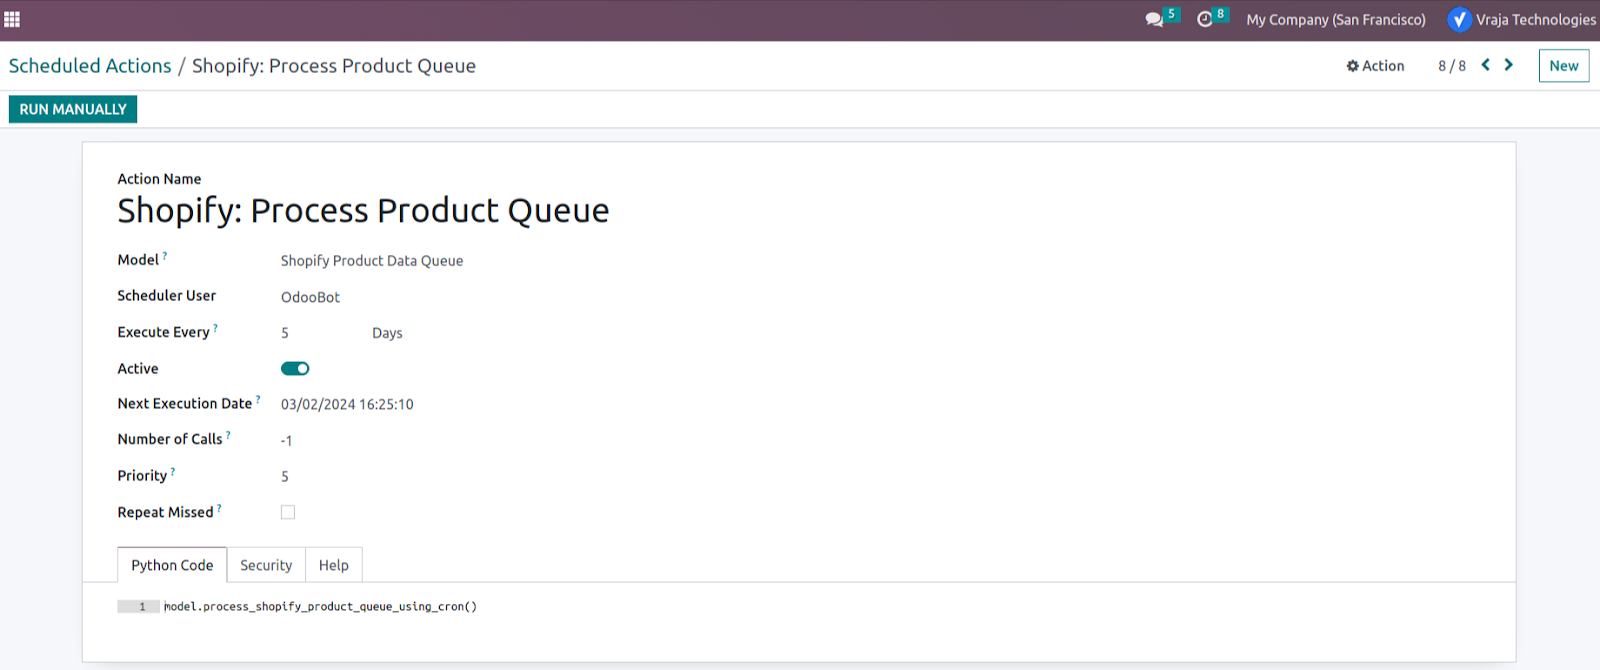
The Product queue will automatically execute through this scheduled action.
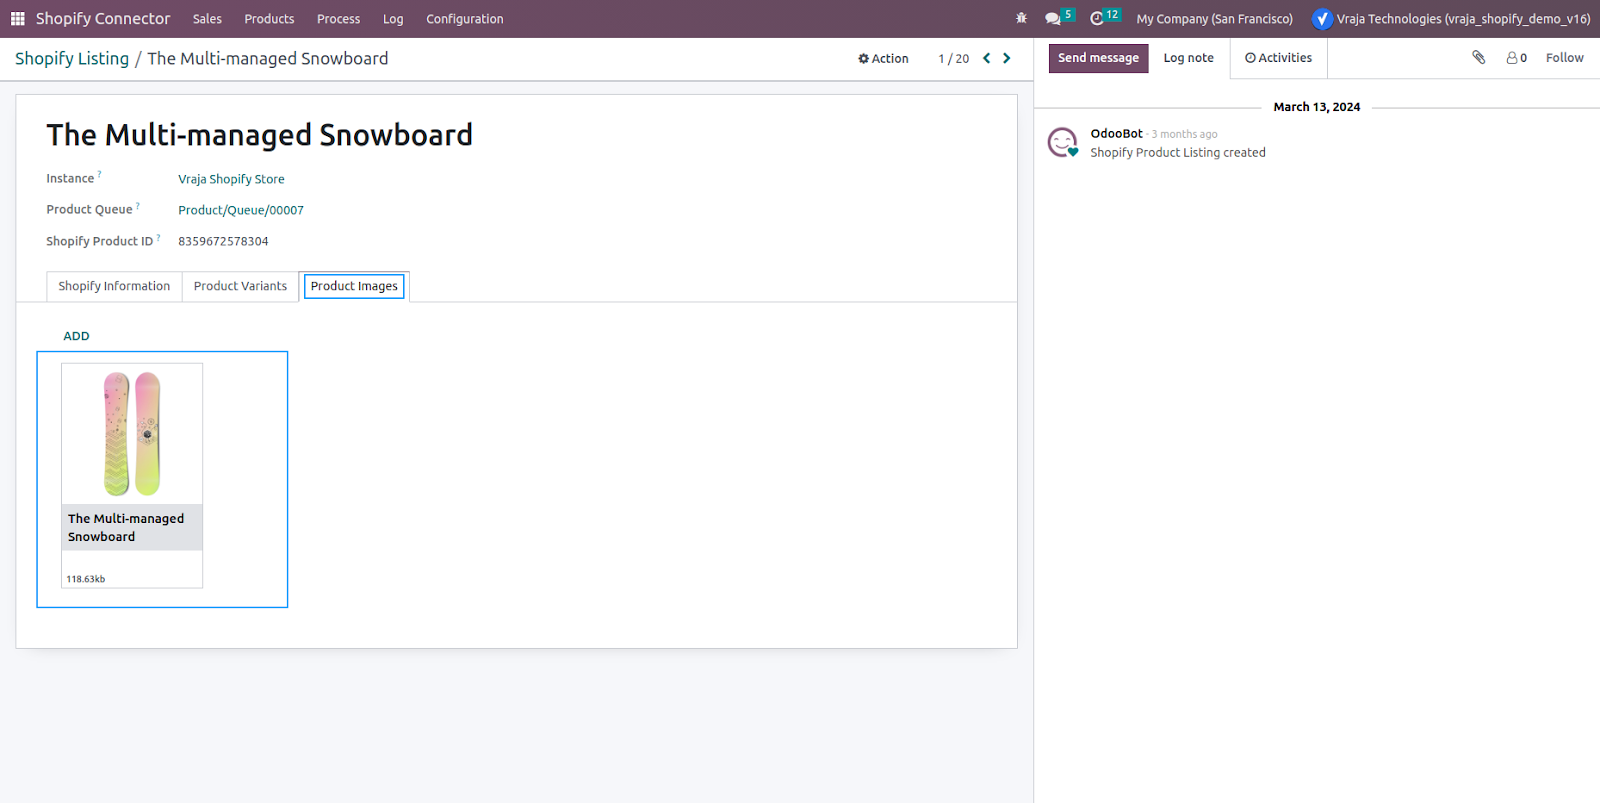
After the queue is processed, Product Listing & Product Listing Item records will be created & you can navigate it to Shopify Connector > Products > Product Listing.
It will store information of product details.
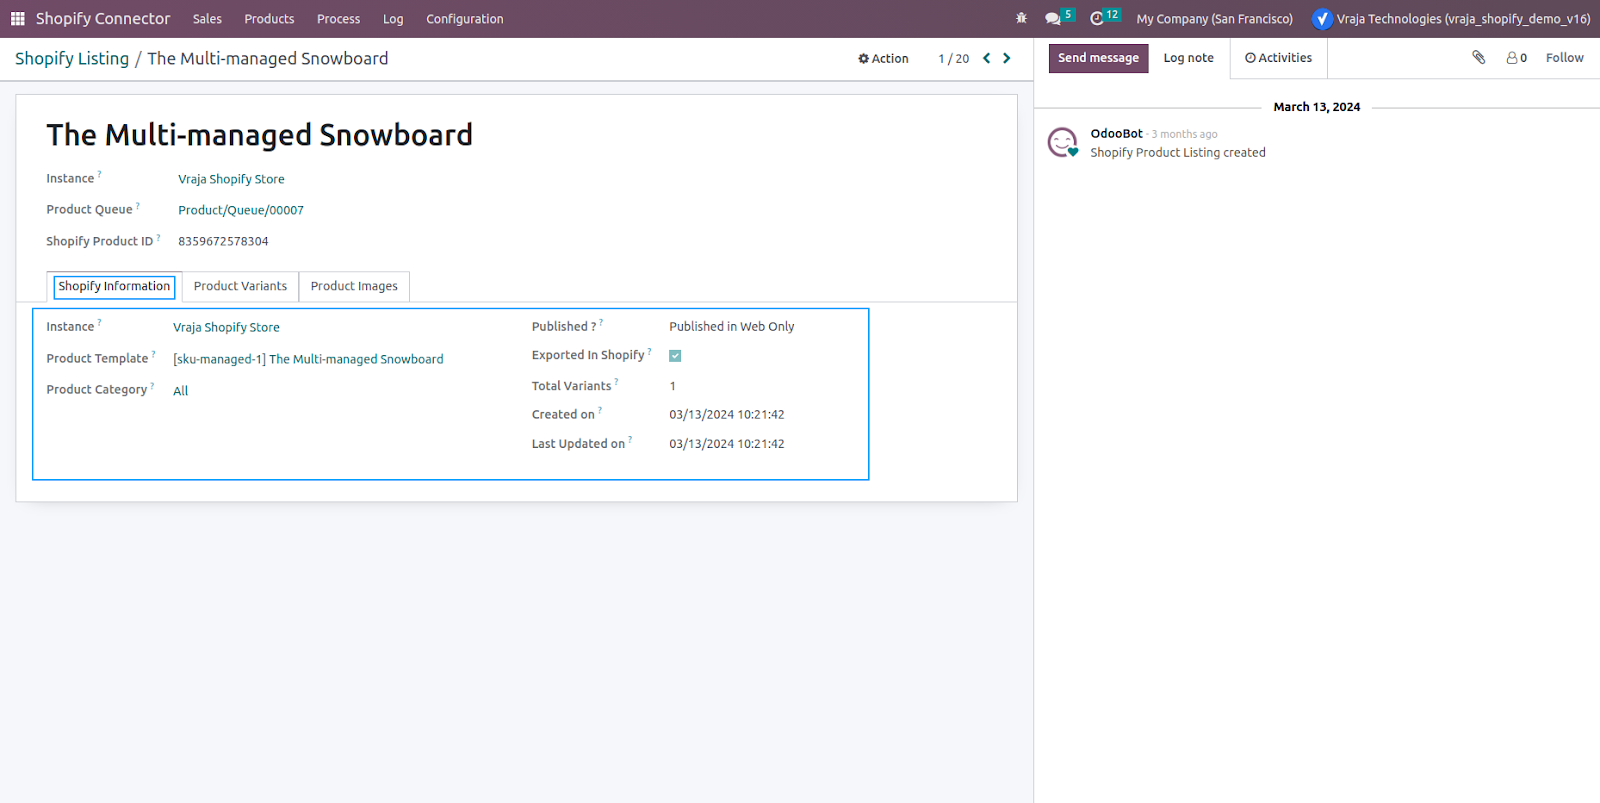
It will store information of product variants if any.
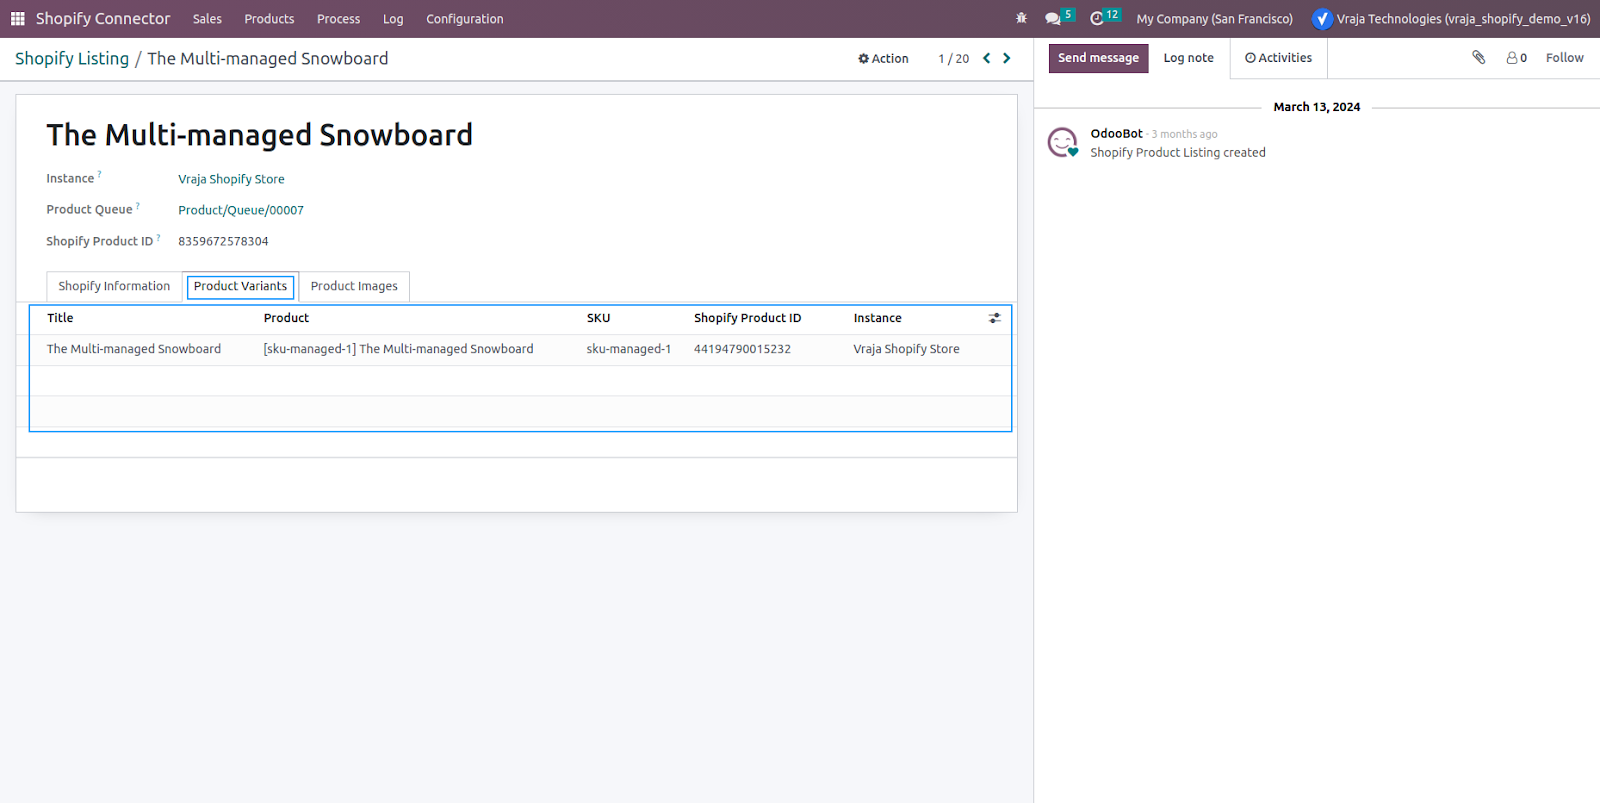
It will store information of product images.
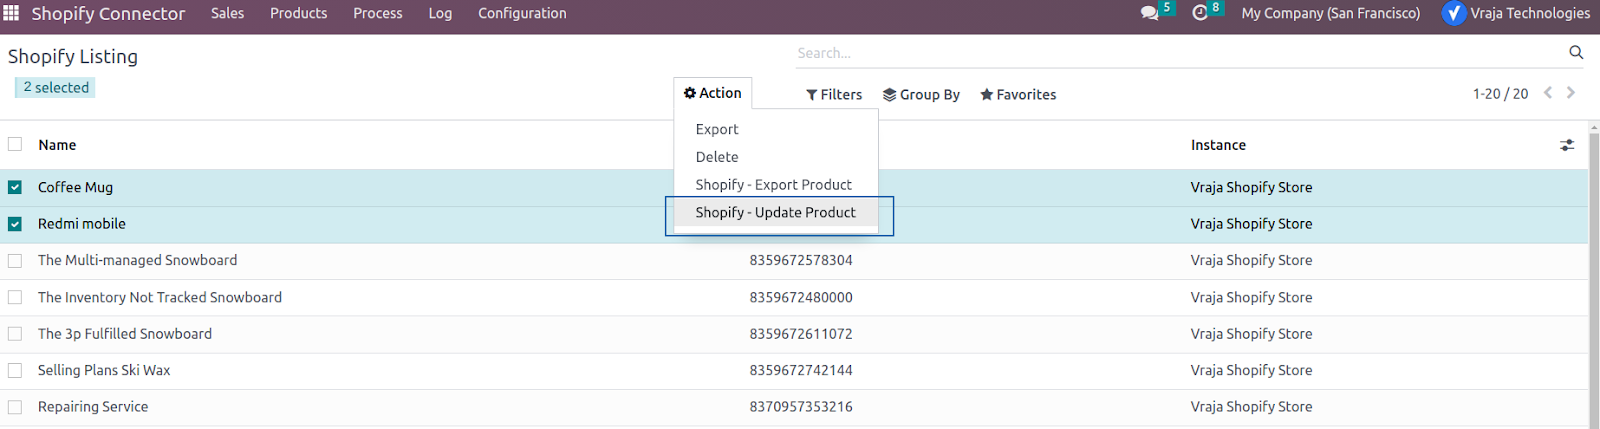
2. Update Product
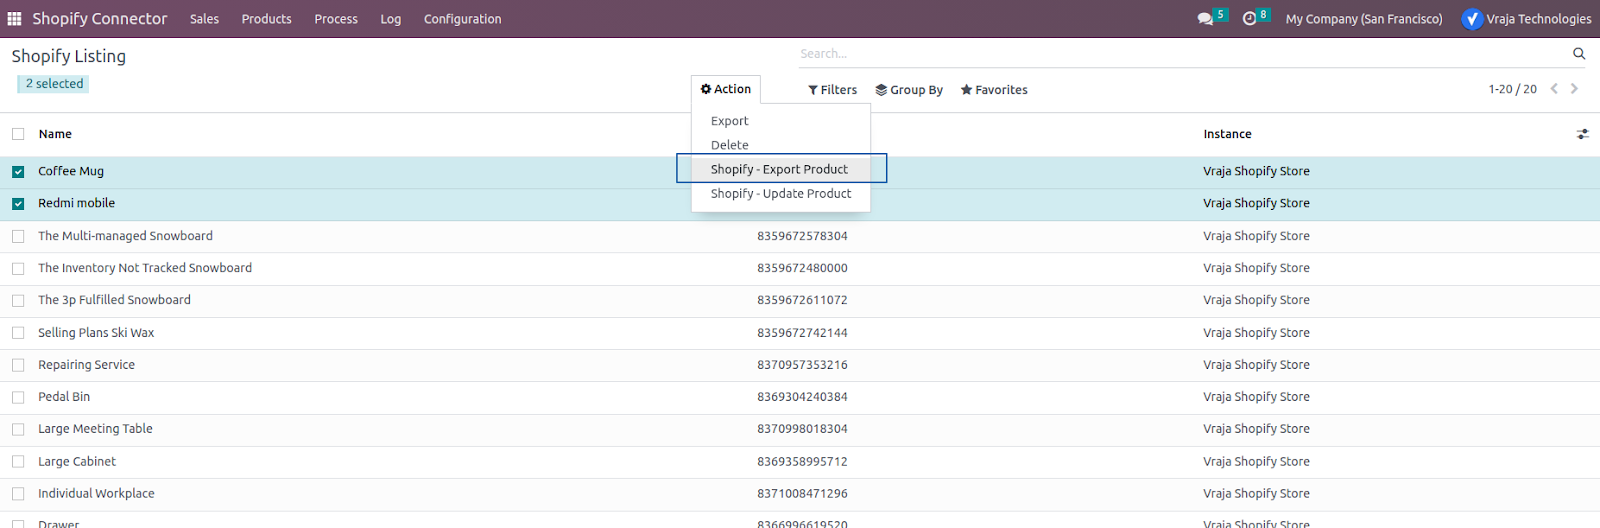
In existing products, if you do any modification in Odoo & want to update those details in Shopify then you need to follow this step. From the Shopify Listing list view select record & click on the action button & select ‘Shopify - Update Product’.
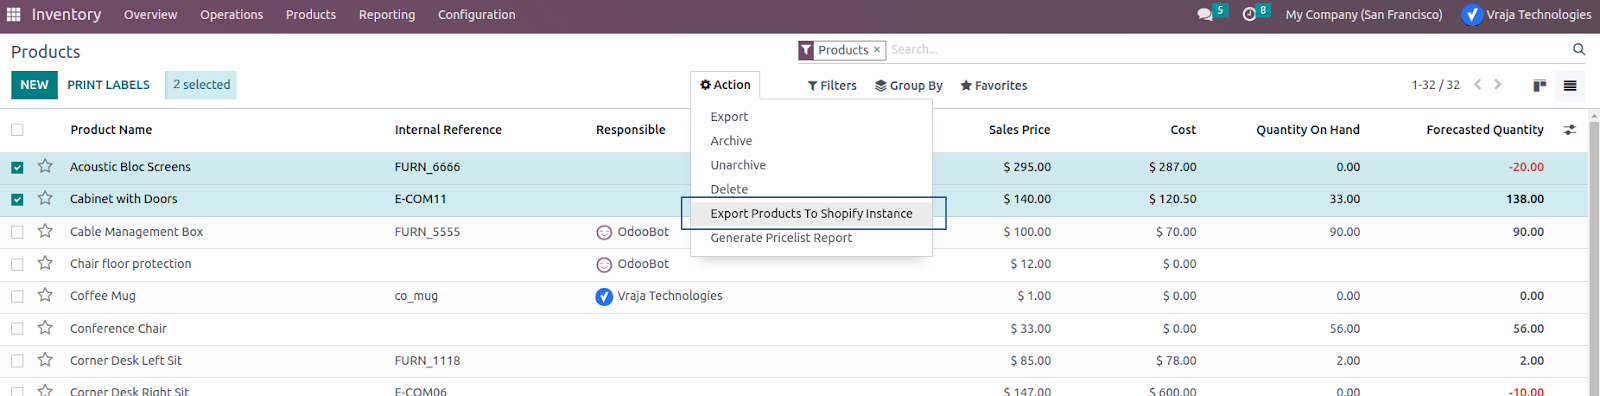
3. Export Product
For those products which configured in Odoo but not yet synced with Shopify, you can use the "Export Product To Shopify Instance" process from Odoo’s product table first. This will create a new product record in Shopify Instance Shopify Listing table.
Secondly, you have to click on “Shopify - Export Product” process from Shopify Listing table to create new product in Shopify.
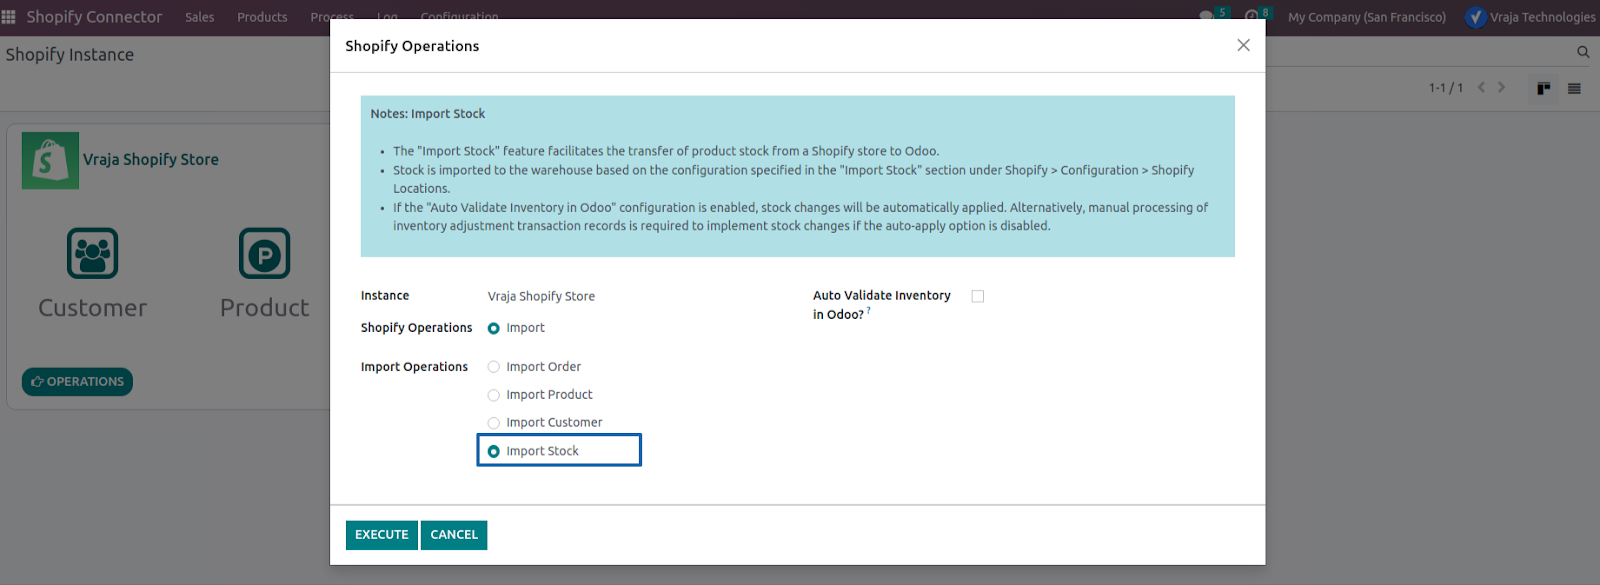
4. Import Stock
The "Import Stock" feature facilitates the transfer of product stock from a Shopify store to Odoo.
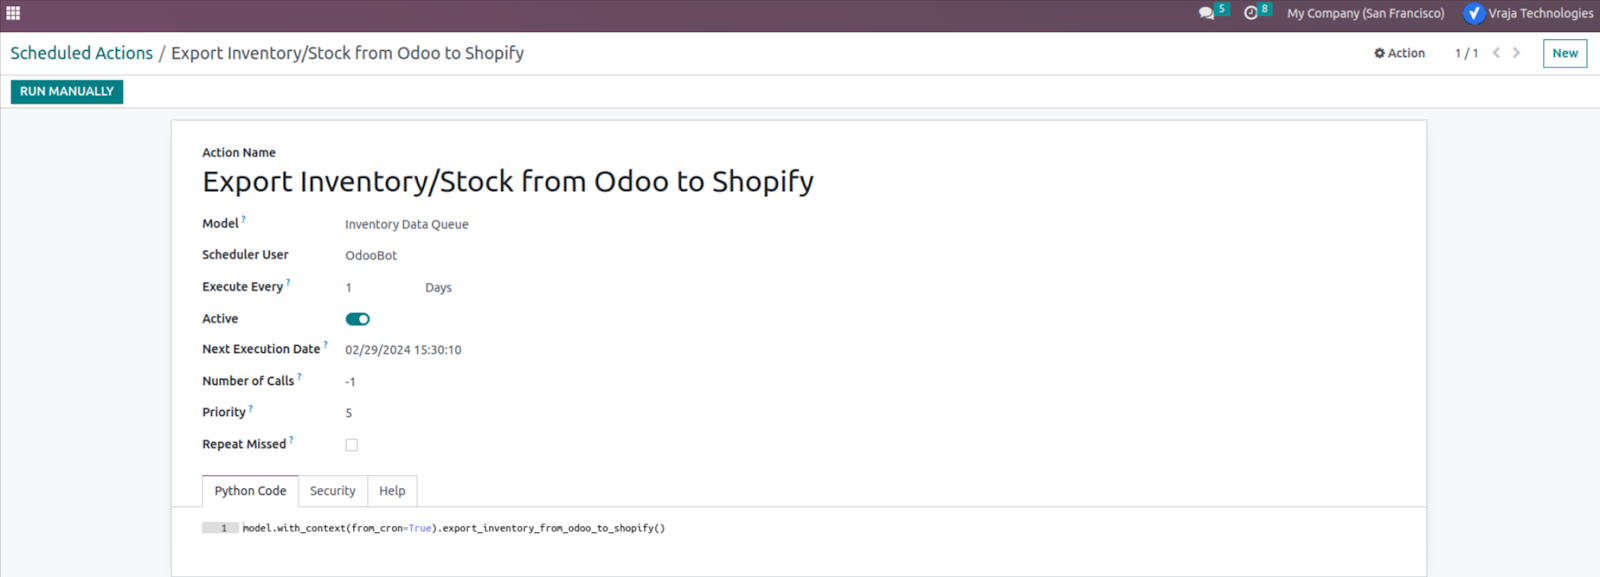
5. Export Stock
For export stock process given one scheduled action which prepare export stock data for Shopify.

Above scheduled action will create Export Inventory Queue which you can navigate through Shopify Connector > Process > Export Inventory Queue. If you want to process the queue instantly then click on the Process Queue Manually To Export Stock button.

The Export Stock process queue will automatically execute through this scheduled action.
Order Process
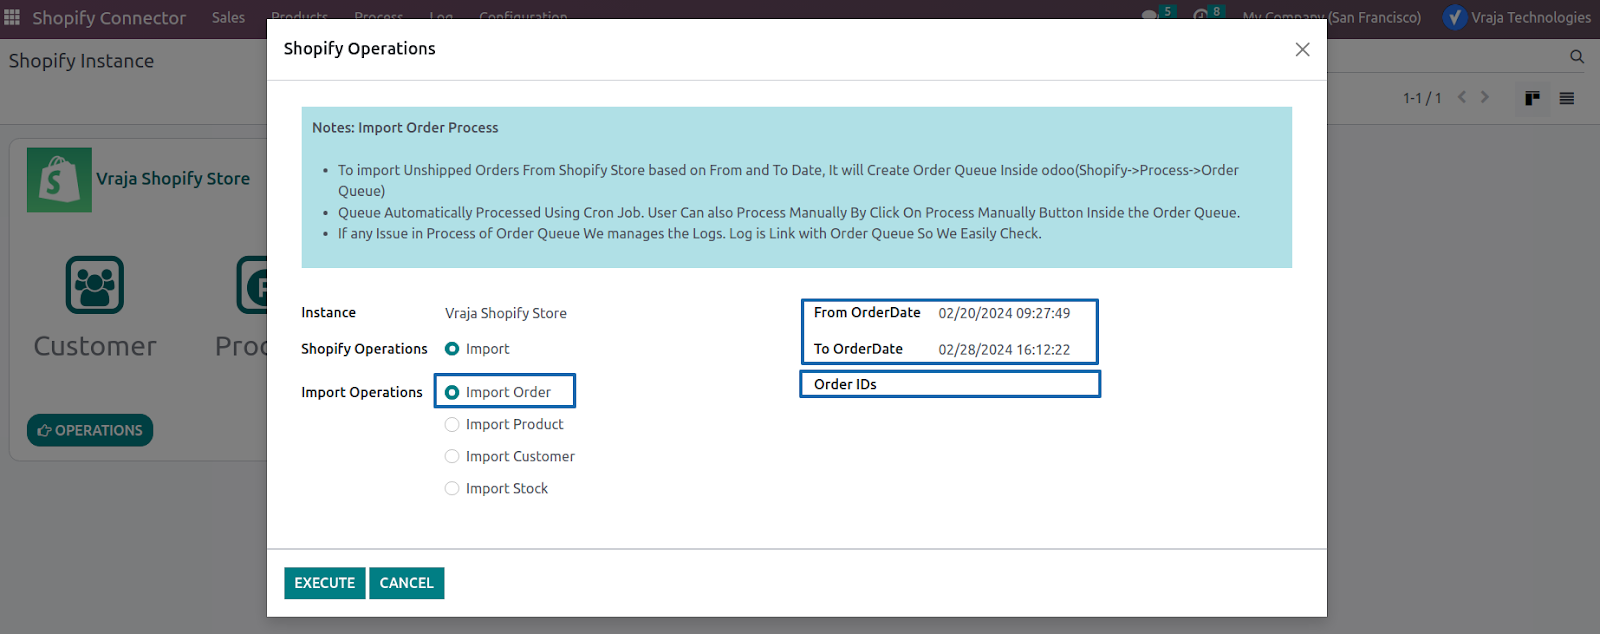
1. Import Order
To manually import orders, from Operations button choose Import order option. You can import Orders in two ways, i.e. Based on From and To Date & Specify Shopify Order IDs
If you want to create Order Queue automatically then we give one scheduled action which create order queue manually for regilar/open orders.

For cancel order import other scheduled action given.
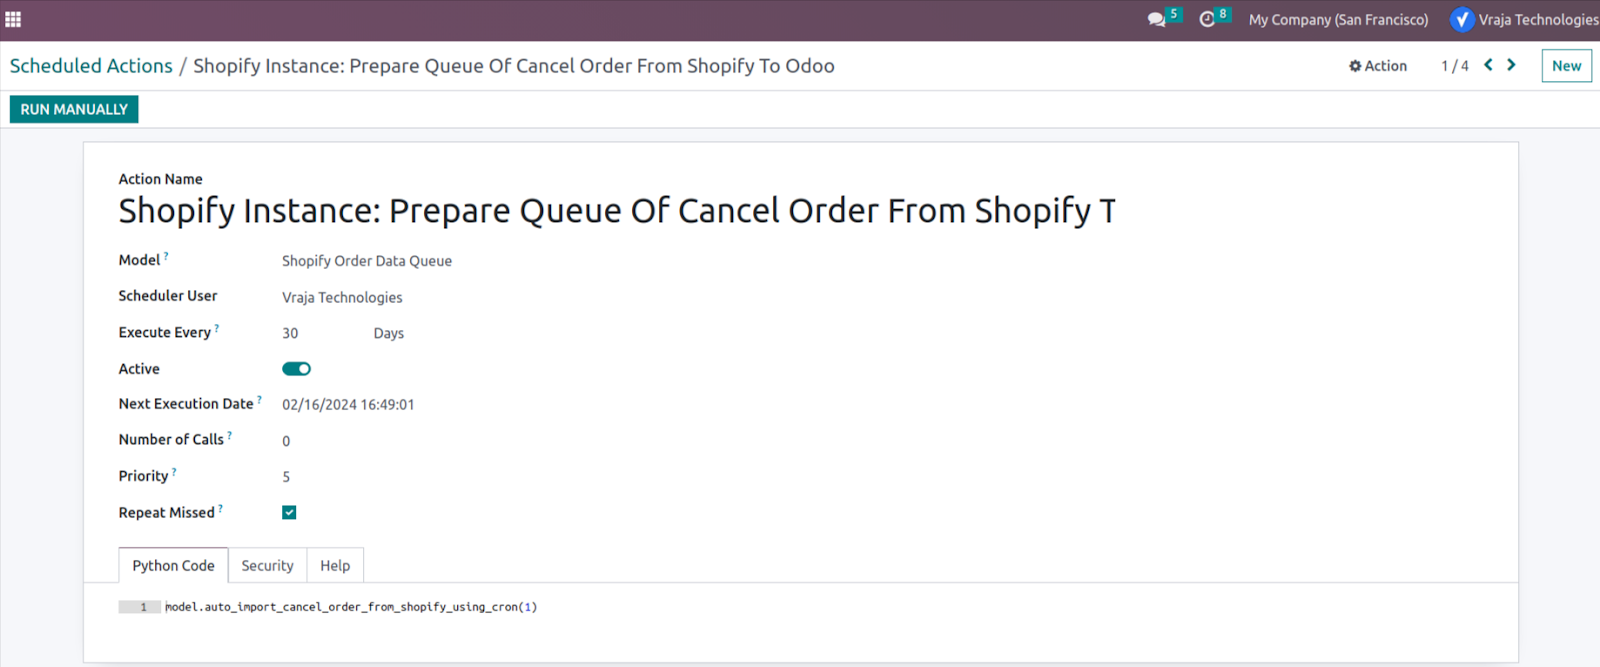
Those both above scheduled action will create Order queue, which you can navigate through Shopify Connector > Process > Order Queue.
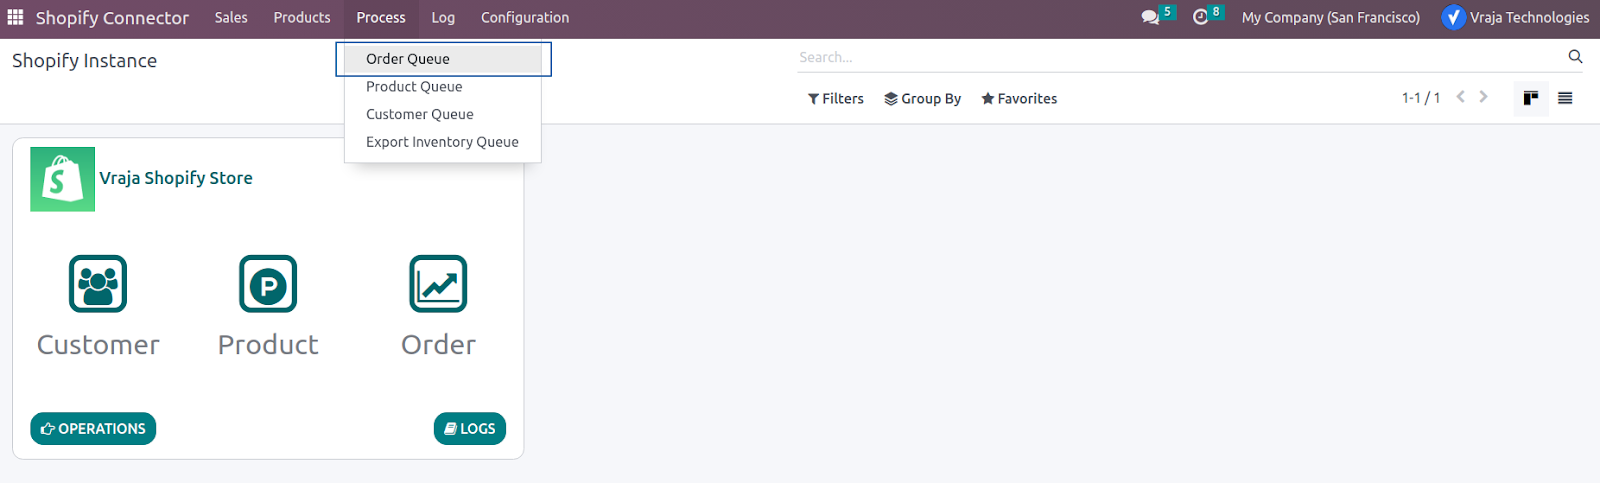
If you want to process the queue instantly then click on the Process Queue Manually button.
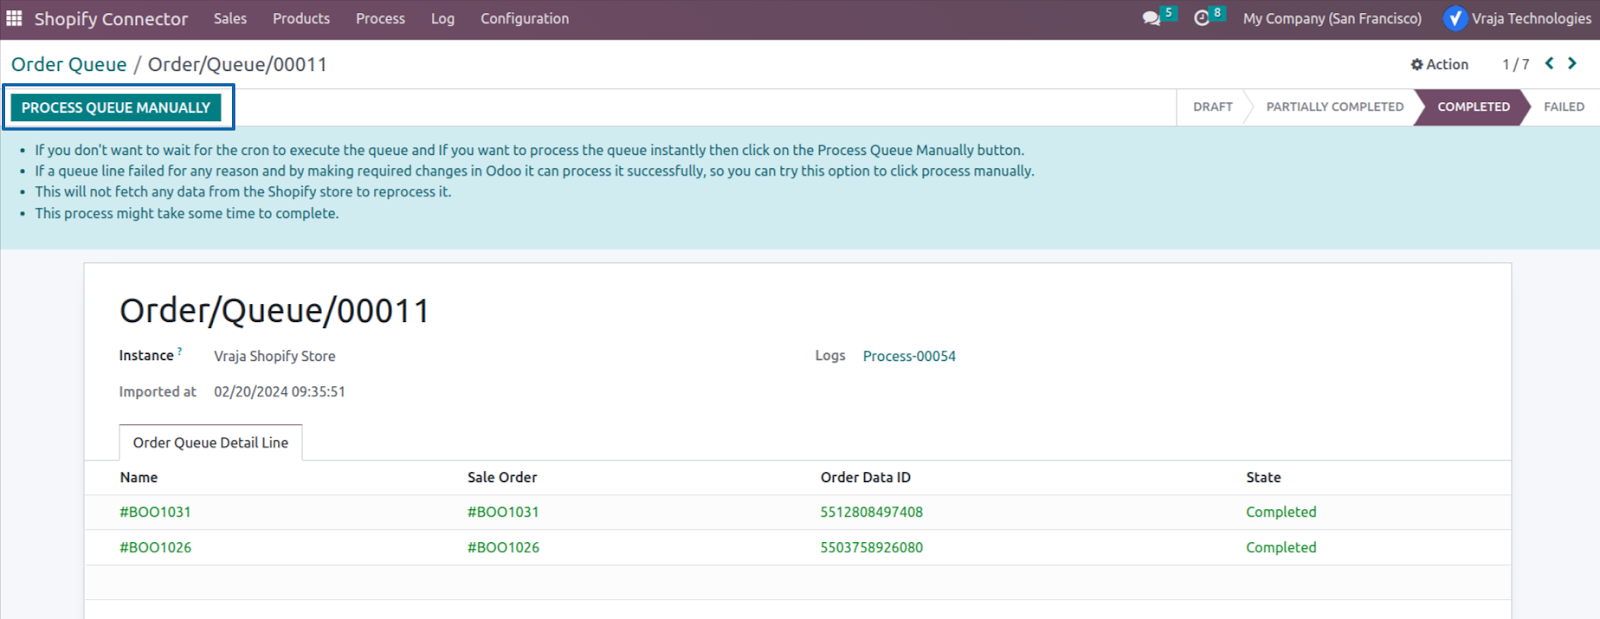
The Order queue will automatically execute through this scheduled action.

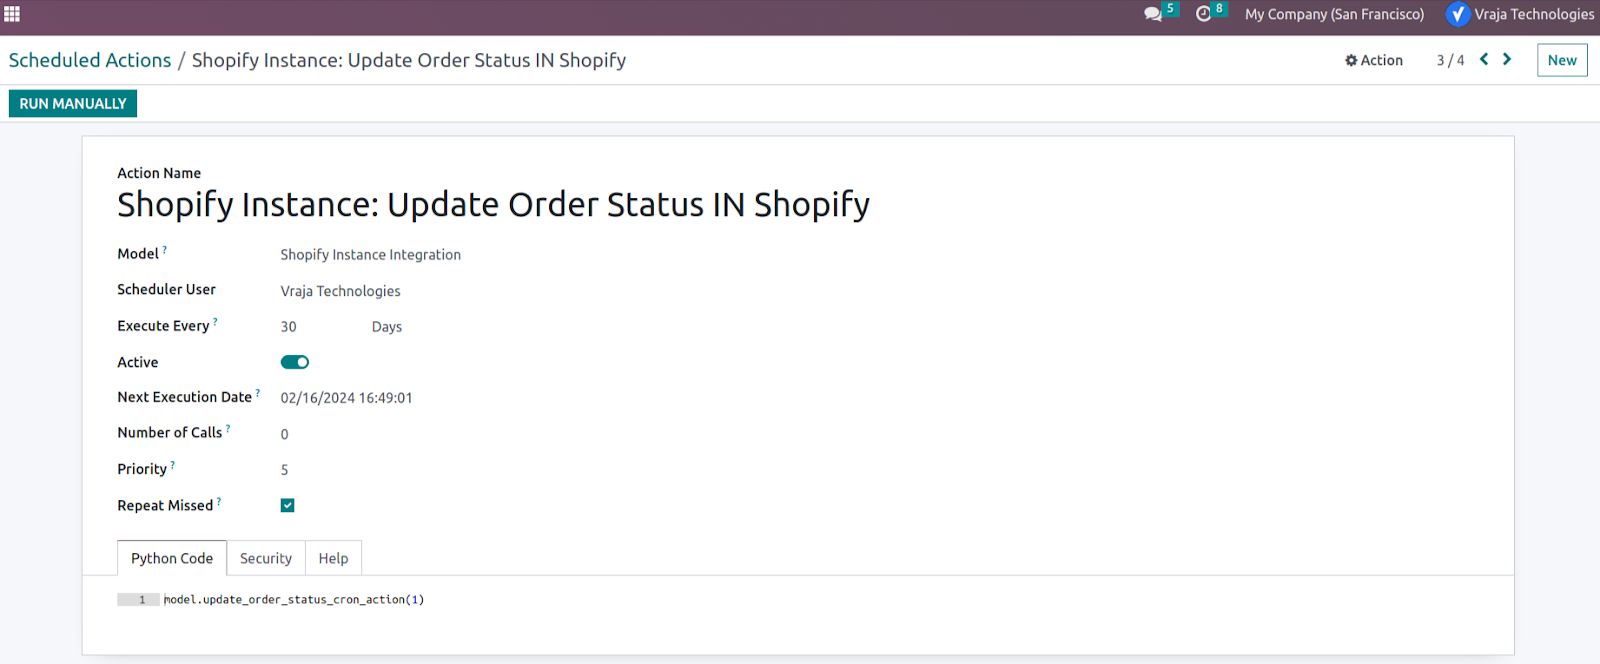
2. Update Order Status
You can manually update order status through your delivery order header button which is “Manually Update Shipment”, Please ensure you granted the necessary Shopify access rights to export shipment information and update order statuses from Odoo to Shopify.
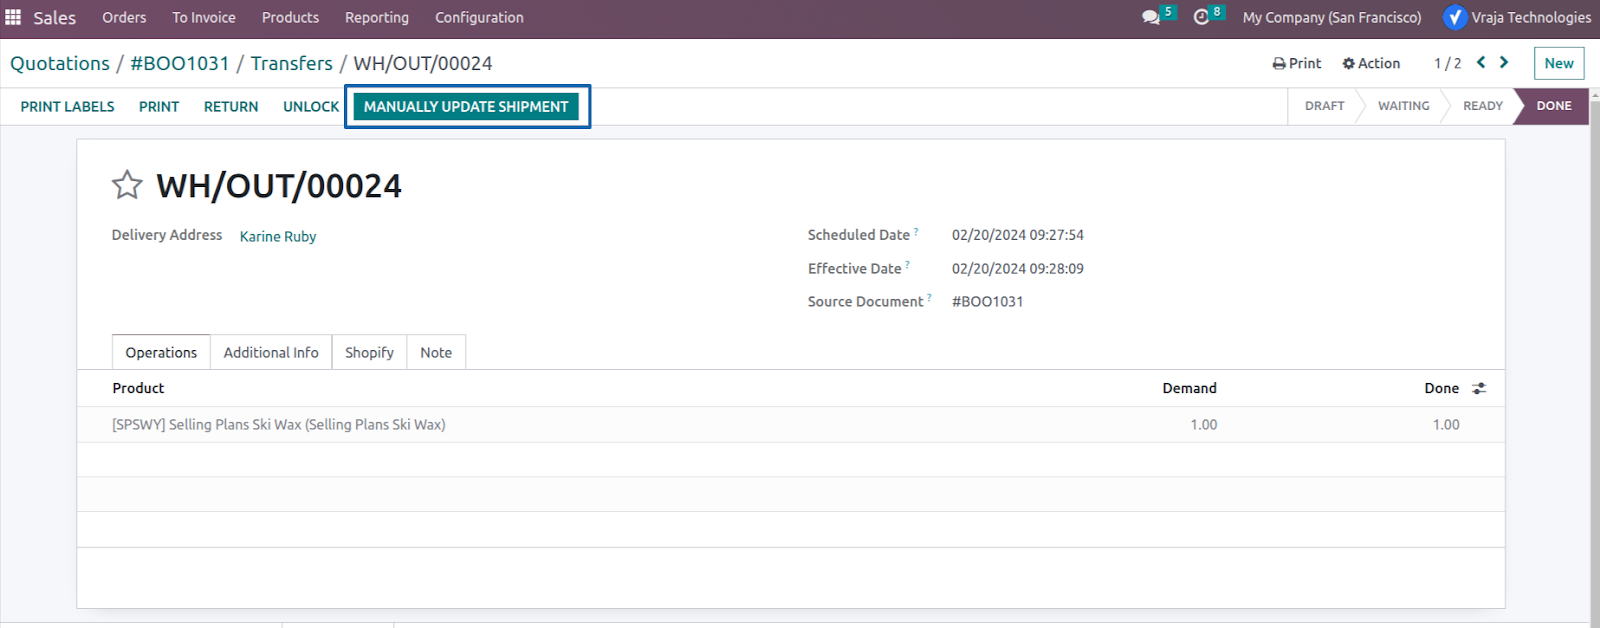
We have given scheduled action also for update shipment/order status from Odoo to Shopify.